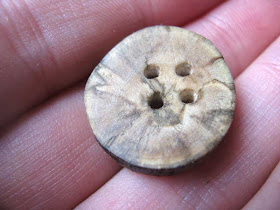
Firstly search for a branch of a good thickness and as straight as possible. This is especially important if you are needing a bunch of buttons all the same size.
Using a hack saw, or an electric saw if you have one which is much faster, simply saw off rounds. About 1/8 inch thick is perfect, any thinner and they risk snapping.
Next step is to drill the holes. Using a a very fine drill bit, drill two or four holes, whichever you prefer. I used an old button as a guide and simply drilled straight through it's holes.
The lovely outside edges will come off eventually anyway, so you might as well knock them off now. Gently buff off any rough edges with some sandpaper, to avoid them snagging on anything.
As indicated by the pic, I like to use a few different grades of sandpaper starting with a rougher one, and graduating to a fine one. Just like buffing your nails!
Lastly treat the wood by rubbing in some natural beeswax, furniture wax or polish. In the pic you can see I have treated half of the button to show you the difference it makes. It really brings out the natural grain and personality of the wood.
And here they are finished - your own handmade buttons!
I couldn't help myself and simply had to sew some onto a garment...
This sweet embroidered wool coat which I have been working on for some time, needed some natural looking buttons to go with the botanical theme so my new buttons worked out perfectly :)
I'm really pleased with them, and they are such fun to make, albeit quite time consuming.
I would love to hear if you make some - and what you use them for :)
Linking up with more creatives here.
xx


Thanks for sharing! I wouldn't have thought of making my own wooden buttons. They look great.
ReplyDeleteThanks for sharing this, we have plenty of wood and branches around our property but I'd never thought to make buttons out of them! I'm a little scared of power tools, but I think I'll have to get over my aversion. Your finished coat looks perfect!
ReplyDeleteWOW those buttons are amazing. Love how the buttons look on the finished coat.
ReplyDeleteTanya
They're lovely, and just perfect for that coat!
ReplyDeleteThose buttons are really beautiful and look perfect on that cardigan. Thank you for the tutorial. :)
ReplyDeleteGorgeous coat - LOVE the buttons - cute
ReplyDeleteThey're gorgeous! This has been knocking in my head for a while but I've never assembled what I need to do it. But you make it look so easy. :)
ReplyDeleteVery very pretty!
ReplyDeleteI love them with the cork :)
Very very pretty!
ReplyDeleteI love them with the cork :)
Wow - they are beautiful - such an awesome idea!
ReplyDeleteWhat gorgeous little buttons... They make that little coat look so cute... I want some :)
ReplyDeleteBeautiful buttons! I also love them unsanded and with bark just for decoration purposes.
ReplyDeleteVery nice! And the buttons are perfect for your jacket!
ReplyDeleteThese are so beautiful! I love making new things out of stuff that would otherwise have been thrown out. I definitely want to try these!
ReplyDeleteThese are very clever and beautiful indeed! How do you think they would go when you wash the garment?do you re wax them?
ReplyDeleteWow, what a great idea! Thanks so much for sharing :)
ReplyDeleteI am so trying this one. I already have my limb, and cut the rounds today. Soooooo I will give them the finishing touches tomorrow.
ReplyDeleteThanks for discussing this, we have a lot of timber and divisions around our residence but I'd never believed to create control buttons out of them! I'm a little afraid of equipment, but I think I'll have to get over my aversion. Your completed cover looks perfect!
ReplyDeletebuy runescape gold
Cheap FFXIV Gil
Thanks for sharing handicraft button, we are also manufacturer of wooden button.
ReplyDeleteBeautiful! I've got a Craft Gossip post scheduled for this evening that links to your tutorial:
ReplyDeletehttp://sewing.craftgossip.com/tutorial-handmade-wooden-buttons/2015/01/08/
--Anne
You can also try Danish oil. It penetrates and protects the wood much better. Wax is a nice natural finish, it just wears off more quickly since wax does not penetrate the wood.
ReplyDeleteI've been doing something similar for years now, and that's making buttons- but using der antlers.
ReplyDeleteUsing a band saw, I cut the antlers about 1/8th" thick and oil them as well.
You can even stain them if you so desire.
**sidenote: you might want to cover you nose and mouth when cutting the antlers, they're kind of stinky.
the smell doesn't last, just during the slicing.
have fuuun!